Singlespeed · Public discussion

My Fixed Gear Build/Paint Thread!

Started by StepOffBigDee · · Last activity · 19 posts · 4,349 views

This thread is locked and is currently read-only.

Thread navigation

Jump through the discussion

Go to the original post, the replies on this page, or the latest preserved contribution.

Thread details

What we know about this thread

Original section
Singlespeed
Published
7 July 2010
Last activity
12 July 2010
Original author
StepOffBigDee
Posts
19
Discussion status
Public discussion
Total views
4,349
Views / 30 days
0

The navigation and discussion metadata provide context. Posts remain in their original chronological order.

Showing posts 1–19 of 19
Posts remain in their original chronological order.

Text size
  1. Hey guys.
    So around 6-7 months ago, my brother gave me a bike frame and also an old wheelset with a fixed gear hub. The bike frame was some 1970 Huffy cruiser and I decided to build it up for my first fixie. After building it up, I still couldn't get over it's baby blue color. haha So I decided to try and paint it. Stupidly, I just got my can of spray paint and started spraying. No paint remover, sanding, or thin coats so of course it ended up like poo. Now, I'm going to rebuild the frame and hopefully replace some parts, headset, crankset, pedals, etcc and also repaint the frame. This thread will be used for me to post pictures and updates as I go along and if you have any questions I can answer them.

    So here's what my bike looks like now.
    img035 on Flickr - Photo Sharing!
    Historical post image

    Right now I don't have any set in stone plans other than painting the frame. I'm thinking of maybe an aerospoke wheelset, some drop bars, new pedals, new stem, and other stuff.

    Hopefully this isn't just a waste of space and will be a little bit interesting to some of you lol. I'm gonna start wet sanding now!

    Thanks for looking

  2. Is that the Huffy? If so, then why would you put aerospoke wheels on a 35 pound bike? Whatever wind resistance your going to cut down on will be lost on the weight of the bike...except on steep down grades. I would just get inexpensive regular spoke wheels which will be lighter then the original Huffy wheels.

    But as a project to learn on it should be fun.

  3. Froze said:

    Is that the Huffy? If so, then why would you put aerospoke wheels on a 35 pound bike? Whatever wind resistance your going to cut down on will be lost on the weight of the bike...except on steep down grades. I would just get inexpensive regular spoke wheels which will be lighter then the original Huffy wheels.

    But as a project to learn on it should be fun.


    Most because of the looks. I dig the look of aerospokes. If you know of any similar looking rims then let me know lol. But yeah that's a good point. I also eventually look to upgrade to a lighter and better frame.

  4. I have a few questions. I'm looking to buy a new stem for my bike. My current stem is a threaded one but I don't know the size. Also, on the top of the lockring of my headset it says "22.4" Is that the diameter of my current stem? If I were to get a new headset, could I use the same bearing cups?

  5. StepOffBigDee said:

    I have a few questions. I'm looking to buy a new stem for my bike. My current stem is a threaded one but I don't know the size. Also, on the top of the lockring of my headset it says "22.4" Is that the diameter of my current stem? If I were to get a new headset, could I use the same bearing cups?

    22.4mm is the standard diameter for a traditional, 'quill' stem. So, you can buy almost any stem and it should fit. The principle SIZE on most stems usually refers to the length of the horizontal extension.

    Vintage French bikes & Schwinn's from before 1985 (?) often used a smaller diameter stem; but, it's unlikely you will encounter one when you are looking.

    If you buy a new headset, it will come with new cups/etc. There is more than one design, so whether-or-not you can continue to use the cups is up-in-the-air ... but, it generally defeats the purpose to buy a new headset and then re-use the cups from the old headset.

  6. Froze said:

    Is that the Huffy? If so, then why would you put aerospoke wheels on a 35 pound bike?

    Needless to say, sometimes conspicuous consumption is a part of the cycling experience!

  7. Froze said:

    Is that the Huffy? If so, then why would you put aerospoke wheels on a 35 pound bike?

    Thinking about it, as pictured, the bike should weigh less than 28 lbs ...

    It's the current wheels + solid steel chainring on that Ashtabula crank + what I presume is a steel seatpost which are the real slugs. The chainring (well, it's technically a chainwheel) can be replaced with a BMX 110bcd spider & a whatever chainring the OP may want to use ...

    It should certainly be possible to get the final weight of the particular bike to under 25 lbs. Maybe, closer to 23 lbs.

  8. Is that the Huffy? If so, then why would you put aerospoke wheels on a 35 pound bike? Whatever wind resistance your going to cut down on will be lost on the weight of the bike...except on steep down grades. I would just get inexpensive regular spoke wheels which will be lighter then the original Huffy wheels.[LEFT]

    [/LEFT]

  9. alfeng said:

    Thinking about it, as pictured, the bike should weigh less than 28 lbs ...

    It's the current wheels + solid steel chainring on that Ashtabula crank + what I presume is a steel seatpost which are the real slugs. The chainring (well, it's technically a chainwheel) can be replaced with a BMX 110bcd spider & a whatever chainring the OP may want to use ...

    It should certainly be possible to get the final weight of the particular bike to under 25 lbs. Maybe, closer to 23 lbs.


    Thanks for all the help you guys. So I think I'm just going to keep the same headset. I'm a bit confused regarding the stem though. So 22.4mm is the size but I only see 1" (25.4mm) and 1 1/8" stems? which are bigger than 25.4mm. Which stem do I have to use?

    Thanks

  10. StepOffBigDee said:

    Thanks for all the help you guys. So I think I'm just going to keep the same headset. I'm a bit confused regarding the stem though. So 22.4mm is the size but I only see 1" (25.4mm) and 1 1/8" stems? which are bigger than 25.4mm. Which stem do I have to use?

    The 22.4mm is the diameter of the veritcal portion of the stems which have a '7' shape & are used with forks that have threaded steerers & a threaded headset (cup - headtube - cup - lockring). This is typically referred to as a QUILL STEM, now, and is the type you want. 22.4mm is the INNER DIAMETER of the steering column on most forks (again, vintage French bikes & vintage Schwinns are the exception).
    [INDENT]There are three (?) clamp sizes which correspond to the center section of the handlebars -- 25.4 (Flat/MTB bar & steel), 26.0 (can be used with handlebars which have a 25.8 center section, too), and 26.4 (Cinelli/-type) ...
    [/INDENT]The stems which are used on THREADLESS steerers are typically 1" & 1 1/8" ... the 1" stems being relatively rare because more-often-than-not a 1 1/8" stem would be used with a shim to allow it to clamp onto a 1" theadless steerer.

    A 'threadless' stem can be used with a threaded fork if you get a quill adapter which is basically a stem without the horizontal portion but which usually has a 1 1/8" diameter barrel as a cap onto which the 1 1/8" stem would be clamped. There are some 1" quill adapters, but they are rarely seen.

  11. Okay thanks. I read on sheldon brown that the stem should match the inner diameter of the steerer in the fork which is 22.4 I am having trouble finding 22.4 quill stems, will 22.2 work fine? Such as this ROAD/FIXIE/TRACK BIKE BICYCLE QUILL BAR STEM 80 22.2 mm - eBay (item 290450081635 end time Jul-07-10 12:10:01 PDT)

  12. StepOffBigDee said:

    Okay thanks. I read on sheldon brown that the stem should match the inner diameter of the steerer in the fork which is 22.4 I am having trouble finding 22.4 quill stems, will 22.2 work fine? Such as this ROAD/FIXIE/TRACK BIKE BICYCLE QUILL BAR STEM 80 22.2 mm - eBay (item 290450081635 end time Jul-07-10 12:10:01 PDT)


    It should be workable -- if it is sloppy inside the steerer, then you can make a shim from a soda/beer can ...

    Are you sure you want a stem that is only 80mm long?

    BTW. I guess that 22.2mm is the standard size for the diameter stem's shaft and not the 22.4 that I stated (above) ... sorry if I added to the confusion ... I was just reflexively copying the number you used.

    BTW2. You MAY want to buy the handlebar, first.

  13. Oh not so sure about the stem yet. I just found the first one that popped up on ebay lol. Probably going to get a 100mm or 110mm stem. I'm just about to buy the handlebar. The one bars I plan on getting are the Easton EA30 Drop Bars since they're only $5 lol. But they only have 26.0. I'm having trouble finding a 22.2 quill stem with a 26.0 clamp that has a length of around 110mm. If anyone has one or knows where to get one, let me know lol

  14. Okay so I started to wetsand the frame and fork. I'm still not sure what color I would like to paint the frame. I'm thinking either dark green, black, or white/almond. I'm leaning towards dark green or black since my handle bars are already black so I wont have to paint them to make it match. I have a question about cranksets. The stock one is a one piece, what do I need to do for a 3piece. Ive had a bike with a 3piece and the inside of the bottom bracket is threaded. How will I do this to my nonthreaded bottom bracket. Thanks!
    So this is my progress in wet sanding.
    Historical post image
    Yesterday.
    Historical post image
    This morning
    Historical post image

  15. StepOffBigDee said:

    I have a question about cranksets. The stock one is a one piece, what do I need to do for a 3piece. Ive had a bike with a 3piece and the inside of the bottom bracket is threaded. How will I do this to my nonthreaded bottom bracket.


    The BMX 110bcd 'spider' which I alluded to is your best bet if you still have your crank & BB ...

    There is an ASHTABULA-TO-EUROPEAN (aka "English"😉 BB adapter -- they cost between $20 & $30 ... the price varies depending on where you buy it.

    [CENTER]Historical post image[/CENTER]

    [INDENT]Check One-Piece Cranks.

    www.danscomp.com specializes in BMX components & used to carry this item ... but, it's not listed on-line ... ask them for a copy of their catalog OR call them on their '800' customer service number.
    [/INDENT]After you fit the BB adapter in the frame, you can use ANY English threaded BB + 'matching' crankset.

  16. Ah alright, well that'll have to wait lol. This question is a little bit off topic, but you've been a great help. I have a giftcard to homedepot (hardware store like lowes/ace). I'm wondering what I should get. I'm getting some parts for a homemade headset press but I don't know what else. It's pretty far away so I'd like to buy whatever I need no so I don't have to come back.

    Thanks

  17. StepOffBigDee said:

    Ah alright, well that'll have to wait lol. This question is a little bit off topic, but you've been a great help. I have a giftcard to homedepot (hardware store like lowes/ace). I'm wondering what I should get. I'm getting some parts for a homemade headset press but I don't know what else. It's pretty far away so I'd like to buy whatever I need no so I don't have to come back.

    Generic METRIC tools can be bought as SEARS, etc. for X-dollars ... the tools will probably be half the cost at HARBOR FREIGHT ... and, you'll pay more from a Matco or Snap-On dealer than you would at a place like SEARS.

    Bike tools can be bought at your Local Bike Shop ... or via mail order -- Nashbar, EXCEL, Colorado Cyclist, etc.

    While a headset press is a nice idea, particularly if you have a headset with alloy races/etc, STEEL headsets can be "tapped in" using a hammer + scrap of 2x4.

    Your OLD, existing cups/races can be "tapped out" by using a hammer + the 'tail' (or, whichever end works for you) of a standard size file ...
    [INDENT]PRACTICE tapping your current headset races out of the frame, now, and then see if you can tap them back in using a hammer + a file + scrap of wood before buying the threaded (carriage) bolt + washers & nut.

    You can tap alloy cups/races in a hammer + 2x4, BTW, as long as you are capable of striking the piece of wood squarely ...
    [/INDENT]So, short of buying some gardening supplies or lighting fixtures for your home which may-or-may-not be available from another store near you, I would suggest that you buy a few spray cans of EPOXY SPRAY PAINT ... call ahead to see whether they carry any ... "Red Devil" is the brand that comes to mind. The color choices will be limited.

    While the Epoxy spray paint can chip, it will be more scratch resistant than regular paint.

    Lumber is good. If you're handy, then I would suggest you make a "workstand" of one sort or another ...
    [INDENT]Basically, you simply want something which will prop the BB high enough off the ground to elevate the rear wheel AND turn the crank and thereby allow you to make adjustements to your bike's drivetrain while you are in comfort of your home ...

    So, the 'cradle' beneath the BB shell has to be less than 2.5" wide ... and, the 'base' supporting the cradle should be stable (e.g., a rectangular piece of plywood/whatever or a 'T'-or-'X' onto which the pedestal portion is attached.

    If you do decide to make a stand from wood then don't forget the appropriate glue + fasteners (screws/nails + L-brackets or joist hangers if you aren't doing a mortise & tenon construction) ... let your woodworking skills be your guide in determining the design).

    A simpler idea (and,I'm probably not getting this exactly right), but at least one person has noted that they hang their bike from the saddle via a hook which is attached to a rafter in their basement OR tree limb (?) to elevate the rear wheel ... so, a suitable length of 3/8" to 1/2" nylon cord might be something to buy.
    [/INDENT]How stable you make your DIY stand will determine how quickly you can perform some tasks.

    That's what comes to mind ... sorry it's not a better shopping list.

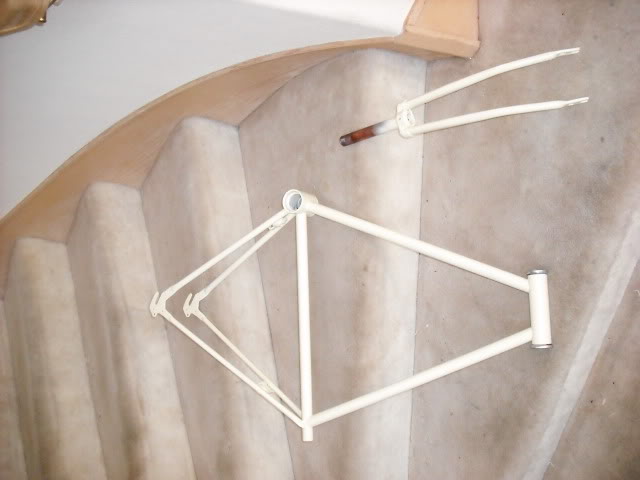
  18. Thanks a ton man! That's a good idea with the wood workstand and I'll probably eventually make one. So I decided that I'd paint the frame and the fork almond, like a really light brown. And paint the seat post and little accents dark brown. Can't wait! I started painting this morning. I've been doing light even coats every 30 minutes until the bike is fully painted. Now I'm just going to wait maybe 2 days then wet sand it with 2000 and then apply the clear coat. Pictures will be up tonight!

  19. Okay well I primed, wetsanded, and painted the bike and fork. Does anyone know how long it takes for the paint to fully harden. I waited 48 hours and the paint still scratches very easily. I had to retouch the scratches I made when I started to build it back up.

    Also I bought this 1" threaded headset but the bearing ups were way to small for my head tube. I guess I need the 1 1/8".

    Here are some pictures!
    Historical post image

    Stock wheelset with some panracer pasela tires
    Historical post image

    Brown seat post, seat post clamp, and fork cap thing
    Historical post image

    Eastern EA30 Drop Bars (Only $5 !)
    Historical post image

    Some Wellgo pedals with toe clips
    Historical post image

    Another flick
    Historical post image

Active in the last 60 minutes

Active in this thread

0 users · 0 guests ·0 bots ·0 total

No signed-in users are active right now.

No known search crawlers active right now.